torek, 26. februar 2019

SALTED CARAMEL


Golden Caramel Hour


For me there are days when I choose to tone down my eyeshadow and go for a more natural, caramel look. This time I have created this golden to bronzed look with my Salted Caramel palette from I heart revolution. You might be already familiar with how much I love this brand, since you can read only good comments about their products on my blog. No jokes, their shadows are so pigmented and creamy like butter.
This Salted Caramel palette dupes the Semi Sweet Chocolate palette from Too Faced. By looking at it  I see that this is one of the first chocolate palettes that I heart Revolution ever came up with, since it has only 16 shades in it, when their newer ones contain 18 shades. However I adore it very much.
To be honest, I have experienced fallout with the darker matte shades, since they are so pigmented. I suggest dealing with them lighthanded and always tap of the access.


The swatches


The Salted Caramel palette
Delicious - matte off white beige - great for browbone highlight
Tempt - matte black
Heavenly - matte light pink
Drizzle - matte medium brown
Enjoy - matte brown

***

Choc - satin mmedium brown
Cake - pink iridescent with golden reflection
Perfect - matte light to medium brown
Crunch - satin light blue - great for the lower lashline, for the pop of color
Sweet - matte warm caramel brown
Fudge - satin medium brown

***

Salted - medium to dark satin brown
Candy - light neutral matte brown
Caramel - satin gold
Spoon - light rosegold
Yum - light champagne shimmer - great for the inner corner


Salted Caramel swatched


The look


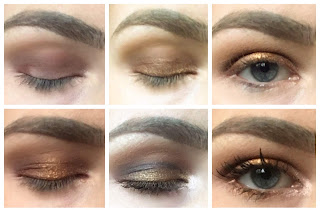
First I applied Delicious all over my lids and used Sweet as my transition shade into my crease. I placed the Caramel shade on the outer half of my lids, and Spoon on the inner half. I used a tiny bit of Choc in my outer V of my crease to define it and placed Cake in my inner corners of my eyes. Last but not least I defined my waterline by applying Crunch and a little bit of Spoon.


Follow me on Instagram as well @radioactive_heart

sobota, 16. februar 2019

OUT OF THE BLUE, MACAROON

I HEART REVOLUTION's eyeshadow palette review and tutorial


The Macaroon palette
This one was launched in August of 2018, along with the Lemon Drizzle palette and the Cotton Candy one. You can buy it seperatelly or in the chocolate vault
Since I own a precious pair of blue eyes, this palette suits them the best. It's a perfect mixture of natural coper shades, combined with aqua blues and some greens as well. It contains 18 pans, the colors are matte, shimmery and foily metalics. All together we get 4 mattes, 8  shimmers and 6 metalics. 


COLORS 

From Coconut to Whisk
Coconut – icy white shimmer with a mint green shift

Almonds – matte pale beige

Craze – shimmery light brown

Divine – metallic khaki green

Nom Nom – lagoon teal shimmer with a white shift

Baked with Love – matte muted warm taupe

Dessert – light gold shimmer

Petite – pale metallic copper

Sweet Treat – icy blue shimmer

Sugarcoated – white shimmer with a silver shift

Blueberry – taupe shimmer with a white gold shift

Whisk – antique gold metallic shimmer


From Icing to Dazzling
Icing – pistachio green metallic with a slight shimmer


Chocolate – matte chocolate brown


Heavenly Bite – matte mustard brown


Finishing Touch – midnight blue with a silvery shift

Meringue – pale copper metallic

Dazzling – deep silver shimmer with an icy silver shift


THE LOOK


The finished look

As you should always - apply eyeshadow primer or concealer to your lids. I used the shade Almonds all over the lid so I set the base. Next I used Chocolate as a transition shade with Baked With Love in my outercorners of my eyes. I used a rounded blending brush to apply BWL  and a fluffy one to blend all of the colors together. Next I cut my crease with a concelaer and applied Petite towards the outer corners of the concealer. Next I used whisk to fill in the space towards my inner corners. Last but not least I applied Coconut in my very inner corners of my eyes, which gave the highlight a light green reflection and placed Icing and Divine on my lower lashline. Icing towards the middle and Divine in the outer corners. 
Unfortunatelly there's not an apropriate highlight shade for your browbone since makeup artists don't suggest putting a shimmery white shade there. 

The tutorial


You can purchase this bad baby here!

Follow me on Instagram as well @radioactive_heart

sreda, 13. februar 2019

PRISM

ANASTASIA BEVERLY HILLS

music 

I asked my followers on Instagram which look they would like me to do first, and over 70 of them decided on ABH's Prism palette. 

The palette itself feels luxurious. The paper-plastic container is covered in black velvet, decorated with golden writing.

I fell in love with it the first time I saw that palette, with all of its foilly metallic shades and pops of color, such as the Sphere (bright yellow shade) and the Saturn (brick orange shade). The palette is great for creating both day and night looks, since it houses a few of mat natural shades, along with subtle shimmery light shadows. Moreover it contains soft metallic blue shades and a green one, which, as well as the copper and golden shades, apply like butter on the lids.

The look

For the look I have created, I used 7 different shades from the Prism palette. It can be worn at daytime, but you can also transform it into a nighttime look by adding blue shade into the crease to create a line or swipe on some golden glittery eyeliner. 

After I have placed my eye primer on my lids, I used the Lure shade as a transition color all over my crease, adding a mixture of Eden and Parallel to the outer corners of my eyes. Next I placed the darkest color in the palette, called Obsidian into the lower portion of my lid, just on the outer corner, using a precise rounded brush and blended all the colors together. Next I applied Sphinx on the lid, placing Pyramid on the central part so it made a sleek sculpted finish. After applying some mascara and placing some Sphinx to your lower lash line you are done with the day time look. By adding a line of Osiris into your crease and some bright yellow Sphere into you inner corners you can transfer this look into smokier, night time look. Don't forget to highlight your brow bone and your very inner corners with the shade Lucid.


The ABH's Prism palette day to night look

Follow me on Instagram as well! @radioactive_heart

petek, 8. februar 2019

The FUTURE is Me!


The palette with its swatches

Essence eye and face palette review


There are days when you simply want to add a little bit of something extra on your eyes, a pinch of extra glitter or a light swipe with a metalic eyeliner over your lid. Well, today I felt like it so I came up with this blue-smokey eyelook.

Brushes you will need
Anyways before I jump in to the look I would like to express my honest opinion about this product. It was my first time using it today and I have to say I am not very pleased with the quality of eyeshadow in this particular palette. Essence is a brand that makes much better eyeshadows, so you can tell why I was surprised.
In total, there are 8 shadows in it and a highlighter. I had to use a heavier eyeprimer just to prepare my lids for these chalky powdery eyeshadow. However I have to say that glitters performed much smoother than the matts. I have also noticed they are not as much pigmented as they are in general. On the other hand, the highlighter performed quite well, making my look complete with its cold undertone. I am also pleased with the size of its pan, since is much bigger than the others.
Step by step tutorial
Speaking of pans, in this palette we get 4 bigger sized eyeshadow and 4 tiny sized ones. The palette itself reminds me of Mac’s Smarty Pants palette, just because of the layout. Although I have to admit that I am genuinely pleased with the packaging since it’s bendable and fits nicely in hands while doing your makeup.

The look!

Prime your eyes well before applying any eyeshadow! Prepare for a major fallout so I recomand using washitape or do your eyes first and later finish your face.
For a transition shade I used the matt grey eyeshadow and placed it on my chease, arching it from my outer to my inner corners of my eyes. Then I placed the aqua blue shade into the middle of my lids, slowly dabbing the shadow. I smoked out the colors by using the black glittery shade, placed the grey shade on my waterline. After blending out all of the colors I also put a little bit of highlighter into my inner corners and on my browbone, making my brows look more sleek. At the end I also swiped on some metalic eyeliner, which was also from Essence, called ‘Breaking dark’.

Follow me on Instagram as well @radioactive_heart