četrtek, 16. maj 2019

TEA TREE TREAT ME!

S K I N C A R E


Tea tree essential oil’s active chemical components contribute to its reputation as a powerful yet gentle immune system stimulant, as well as to its ability to reduce or eliminate harmful bacteria and infections upon contact.

Skincare products made out of tea tree have been very popular lately, thanks to their multiple function. You have probably spotted quite a few yourself hanging around in their usual emerald green packaging on the shelves of our favorite drugstores and catalogs.


Who is this guy?


Well, the tea tree essential oil is derived and steam destilled from the leaves of Melaleuca alternifolia tree, which is commonly known as the tea tree. It was, as expected, used for brewing tea a long time ago, far back in the eighteenth century. The oil is very beneficial, since it not only cleanses our skin, but also eliminates bacteria and even viruses. Moreover it helps to improve your immune system, helps to fight internal bacterial infections and even gives a little bit of extra energy for those who suffer from cancer or some kind of autoimmune disease. 

It's not only used for pharmaceutical purposes, it is commonly used in cleaning supplies in our households and in the cosmetic industry, in which helps to clear acne and heal smaller wounds. Of course we have to be careful while using the tea tree essential oil! It should never be used on open wounds or around the eyes! Furthermore I would highly suggest avoiding direct sunlight after the application of the oil, as the oil can sensitize the skin for UV rays. 

About my tea tree pamper routine

Here are some of my favorite tea tree products from various brands. I am currently using them and I can't say enough good things about them. They truly helped out with some of my problematical areas on my face and smoothed out my skin. The essential oil, which I use to treat pimples here and there, recovers the spots over night, however doesn't dry out my T-zone, for which, I am really grateful.

I start my pamper routine with removing all of my makeup. Then I use the facial wash to deeply cleanse my face and neck. Sometimes I use the clay mask too, leave it on for 15 minutes and wash it of. On a good skin day I finish of my routine with the face cream, however when I see a spot in the making, I pop on some of the essential oil and leave it over night. 

Farmasi Cosmetics Dr. Tuna Tea tree range (hair shampoo (2.49 EUR), essencial oil drops (4.49 EUR) and face cream (2.69 EUR) 

Alkmene facial wash with tea tree oil (11.28 EUR)

Oriflame Cosmetics Love Nature Clay mask with tea tree extract (5.10 EUR)


Follow me on Instagram as well @radioactive_heart and on my IGTV Xoxo

This post is not sponsored. All photos are mine. The prices are from their current catalogs, from May 2019 (some of the products are currently on sale).


sreda, 1. maj 2019

MAKEUP FROM BOOHOO - IS IT WORTH IT?


A few months ago a certain sale cought my eye on Boohoo, so I ordered some items from their website. They sell products from various brands, as well as their own. Since I have never tried out any of these, I thought this was the perfect chance to buy some. 
Down below I am going to list these items I had bought as well as tell you my honest opinion about them. I have also prepared some looks, so be sure to check them out too!
(This is not a paid promotion, the prices match the date of the publishment of this post)

1. 24 pan eyeshadow palette from Technic, Trendsetter (£ 6)

Technic Trendsetter
Perfect mixture of neutral and colorful shades, with some shimmers and mattes. In my opinion the palette is suitable for travelling, since it contains multiple shades for any ocasion. Although I would say, that the quality of these shades is 4/5, they are long lasting and blend like a butter. They are great for turned down everyday looks, looks with pop of color and darker smokey looks. However the palette feels sleek, the packaging could be sturdier.


2. 6 pan cream glitter palette from BarryM (out of stock)

Although this palette is not for everyday use, it's a piece that everyone, who loves makeup should own. You can use this glitter lightly on your lids, just to spice up your look, or heavily when you are doing more glamourous looks. I suggest using silicone brushes to apply glitter with dabbing motion, so they stick to the surface better. The glue is already present in the formula, so additional adhiesive is not neccesary. However I would suggest, that you apply a little bit at the time and slowly build it up. You don't want that excess glitter to jumble up in your crease, don't you?

3. Loose glitter brillants from Technic (£ 1.5)

4. Glitter fixer gel from BarryM (£ 3)

These two products kind of go together, so I am going to talk about them together as well. Basically, when applying loose glitter, you need some kind of adhiesive, such as glitter glue or fixing spray. The adhiesive must be applied evenly on parts where you want to place glitter. Then, apply glitter with silicone brush with dabbing motion. In my opinion, this loose glitter was not one of their best inventions. It seems to wear of fast and falls down. However, it certainly looks pretty on photos!


Falsies from Boohoo

5. False eyelashes by Boohoo (£ 1.5)


One of the best falsies that I have ever worn! They feel light and secured. Trim them a bit to match them to your eye shape, apply some eye lash glue (I recommend DUO eyelash glue £ 4.5). What I love about them is that I was able to remove them nicely, after wearing them for a long time, and put them away for a couple more uses. 


Follow me on Instagram as well @radioactive_heart


torek, 16. april 2019

WHY DID I START HOBBY BLOGGING


BACK TO BEGINNINGS


Ever since high school I have felt this need to write about my everyday life, about my thoughts. In my third year at the university. I've finally started a blog, on which you can usually find product reviews, makeup tutorials, skincare advice and posts from my everyday life here and there.

1. I wanted to be a part of this community


Firstly, I knew I won't be able to be a full time blogger, since I am a student and I also work up to 20 hours a week. To be a full time blogger, you need to be active on your social media and post consistently day by day, which I couldn't imagine. However, I wanted to take a little part in that community, even though on hobby level, so I started working on my Instagram profile, trying to post more of quality content, mainly just engaging with people of similar interests. I've made lots of friends and partners in collaborations, with whom I can exchange opinions and get some useful advice. I don't consider myself a makeup artist, I am way far from that. But I love to learn something new and I love to challenge myself and see if I am capable of creating something like this.


 2. I wanted to share a different kind of content


Of course I didn't want to be one of those beauty bloggers, who only post expensive hauls, do their looks with tons of overpriced makeup. I am glad they can live with blogging, and that they can afford it, since they have worked hard on in. But I wanted to post different content, I wanted my audience to see that there are a tons of great makeup and skincare products out there, which are great and you don't have to spend a fortune on them. I wanted them to realize, that these products are as good as the more pricier ones, and that they can also create great looks with them. Although I use a few pricey items myself, I always point out which are worth buying in my opinion. 
I also wanted to present products after I have tried them out myself and been using them for a longer period of time. You usually can't judge skincare products after one use, neither can you makeup. For me it's not only important to talk about how does a certain makeup product smoothly applies on my face, but also how long it stays on, or in case of skincare products, how did they effect my skin after a few weeks of using it.

3. I wanted to present products, which were not tested on animals


I wanted to present my opinion about certain brands and creators, give a shout-out to them, so that my readers could get to know them. I only present and write about brands, who do not support animal testing. I feel like this is quite self explanatory and I am going to write a separate post about fighting animal testing in the future. I think that there is a sea of products out there, which are not tested on animals, enough of them so that you can do your skincare routine and every possible makeup look with them. It's your own call to make.


 4. I wanted to collaborate with brands


It sounds so much fun and it all looks so simple, but in reality you have to work hard for a brand to notice you and send out a free product for you to try out. You need to have a certain amount of followers, be consistently active and have a specific niche where their product fits in perfectly and after you have received their product, you have to follow certain steps of presenting it. You can imagine how happy I was when I received my first PR package. Even though I have a quite small audience in comparison with big beauty gurus out there (March 2019: IG 1,5K followers, Blogger 2K readers) I managed to do it and I get one here and there. And most importantly, my opinion is always honest, even if I got the product for free.


5. I wanted to learn something new


With writing about makeup and skincare and also with reading other people's blogs, you learn so much. With learning comes experience, and with experience knowledge. I am just a starter in this but I've noticed  progress. I've been using different techniques in applying makeup, learned some new tricks and so on. I wouldn't consider myself a guru or a makeup artist. I am just a girl who wanted a new hobby because she was interested in makeup and skincare and wanted to learn something new. Someone, who wanted to share her opinion and way of thinking and get some kind of feedback.


Follow me on Instagram as well @radioactive_heart.com

petek, 12. april 2019

PEANUT BUTTER CUP


VIDEO TUTORIAL


For this project I paired up with Makeup Revolution and presented their ‘new’ palette called Peanut butter cup. The palette has been launched before as a limited edition piece in their I heart chocolate Christmas gift box. However, you can now purchase it on its own. 


torek, 26. marec 2019

Warm Brown Obsession found in Red Velvet

I have purchased these two palettes at around the same time and I have been using them frequently. When writing a review about a certain makeup product, I find it really important that it was used several weeks or even months, before it was spoken about its quality. Although I have had these two jewels in my collection for a longer period of time, I have recently noticed this similarity between them, which I thought I would share with you.

You might not see these similarities between them at first glance, since the Revolution palette has 18 shades, as far as Huda has only 9. But the shades match almost perfectly.

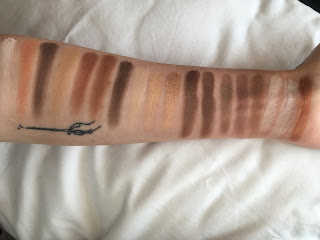
First I swatched Huda’s shades and then tried to find the closest possible color in the Red Velvet palette. I have to point out that some shades didin’t match perfectly, especially the lighter shade in Huda’s palette. For it I had to mix 2 shades from the Revolution palette.

As far as the quality goes I have to say that they are both well pigmented and creamy. Huda's shades might be more blendable and longlasting than Revolution's but that is expected. I am happy with bouth palette's color selection, which allows us to create several different looks. I suggest using eyeshadow primer in both cases, since we are talking about shades with red pigments, which can be a bit difficult to wash off in the first place.

Follow me on my Instagram as well @radioactive_heart


sobota, 9. marec 2019

THE CHOCOLATE VAULT

I HEART REVOLUTION CHOCOLATE VAULT


Makeup Revolution has launched another set just before Christmas of 2018 and I finally laid my hands on it. In this post I would like to show you what you can get in it, as well as provide links to each individual palette with photos, swatches and looks.

The vault itself contains six eyeshadow palettes, two mini face palettes and three lip glosses. Some of the products were initially meant to be vault exclusives, but they were launched separately later on, which made some of their collectors very cross.

The vault is still available to buy from their official website

Continue reading by clicking on the banners!


Eyeshadow palettes:


Face palettes - MINI DUOS


Lip glosses


1. Praline

2. Salted Caramel

3. Chocolate cherry


Follow me on Instagram as well @radioactive_heart

CRANBERRIES AND CHOCOLATE

CRANBERRIES AND CHOCOLATE

eyeshadow palette

I Hear Revolution - Cranberries And Chocolate
This palette was ment to be a vault exclusive piece, but Makeup Revolution has launched it seperatelly as well. The color sheme is fall oriented, so stay tuned for the more detailed review of the palette with the tutorial in the upcomming fall time! 


SMORES

SMORES 

eyeshadow palette

This palette is a chocolate vault exclusive and it contains multiple warm and cold brown shades, some of them matte, some of them shimmers. Check out the scatches down below!


CHOCOLATE CHERRY

CHOCOLATE CHERRY 

Blush and bronzer duo

This mini face palette includes a cherry shimmery blush and a warm brown matte bronzer shade.

PRALINE

PRALINE 

highlighter and blush duo


The praline face palette which is not included in the vault!

This duo is great for travelling as it contains a gentle rose shimmery blush and a snow white pearly highligghter. The packeging is the miniature version of the Praline face palette, although the shades are not the same.

The Praline line


STRAWBERRY AND CHEESECAKE

STRAWBERRY AND CHEESECAKE

I Heart Revolution - Strawberry And Cheesecake


This is one of the three Chocolate vault exclusives! Lovely rose eyeshadow palette with pinches of gold and silver!
The palette itself contains 18 shades, 9 mattes, 8 shimmers and a foil shade, and it's great for creating flirty spring looks. It reminds me a lot of the Pink Fizz palette, which was launched way before this one, however they have improved the quality of their shades and foils a lot! What I was missing from it is a warm matte brown shade, which I would normaly use for a transition shade.


The shades


Fluff - white silver shimmer
Flavour - cherry red matte
Slice - bronzy gold foil
Butter - pale baby peach matte
Juicy - berry pink matte

Earth - dark matte brown
Pinch - peach matte
Fraise - pink shimmer
Strawberry - coral pink matte
Syrup - purple pink shimmer
Base - ale orange matte

Drizzle - pink shimmer
Biscuit - muted orange matte
Forever - silver shimmer with brown shift
Pour - brown matte
Sugar - yellow shimmer


Swatches

The look


This time I am not going to write a detailed tutorial, because I wanted to try out as many shades from the palette as possible and I was just layering them on top of each other. But stay tuned, I will post a video on my instagram profile soon! Follow me on Instagram as well @radioactive_heart !!!

LEMON DRIZZLE

LEMON DRIZZLE


This Makeup Revolution eyeshadow palette contains yellow to red shades, with a few pops of berry shades. All together we get 18 shades, 10 mattes and 8 metallics. Matte shades don't have so much fallout as you would might guess, however the metallics aren't so creamy as you would expect them to be from the otther palettes. Metallics from the palette Macaroon are much better. 
The blendability is great. I always find hard to blend matte berry shades, but not in this palette. The whole palette is quite warm toned, which I prefer, so that might be the reason why it blends easier.
I Heart Revolution - Lemon Drizzle


The shades


Afternoon Tea - caramel matte
Just A Bite - metallic copper
Sugar - eécru matte
Scrumptious - mauve brown matte
Butter - banana yellow matte
Baked - brick orange metallic 


Slice Of Cake - warm brown matte
Lemon Slice - Bright warm yellow matte
Citrus - bright coral pink matte
Fluffy - sheer warm gold metallic
Tempting - muted orange matte
Delicious - deep plum pink with a metallic purple shift
I Heart Revolution - Lemon Drizzle


Sunshine - salmon matte
Zestful - warm brown metallic
Tangy - bright yellow metallic
Zingy - metallic taupe
Sharp But Sweet - matte creme
Nothing But Crumbs - warm gold metallic


The Look


 I wanted to create a burnt orange look with this palette. First I applied my base shades, which were Sharp But Sweet on my lids and Butter for under my eyes which acted as a banana powder. Next I put Tempting on my crease and blended it out with some Lemon slice on top of it. The shades are quite pigmented, so you will have to be careful when applying! Next I used Zingy, mixed with Afternoon Tea on my outer v, blended it out with a round fluffy brush. With a flat brush I placed some gold glittery shades on my lids and placed the lightest shade Sugar to my inner corners and used it as a browbone highlight as well. Last but not least I put some Baked on my lower lashline and finished of the look with some mascara.


torek, 26. februar 2019

SALTED CARAMEL


Golden Caramel Hour


For me there are days when I choose to tone down my eyeshadow and go for a more natural, caramel look. This time I have created this golden to bronzed look with my Salted Caramel palette from I heart revolution. You might be already familiar with how much I love this brand, since you can read only good comments about their products on my blog. No jokes, their shadows are so pigmented and creamy like butter.
This Salted Caramel palette dupes the Semi Sweet Chocolate palette from Too Faced. By looking at it  I see that this is one of the first chocolate palettes that I heart Revolution ever came up with, since it has only 16 shades in it, when their newer ones contain 18 shades. However I adore it very much.
To be honest, I have experienced fallout with the darker matte shades, since they are so pigmented. I suggest dealing with them lighthanded and always tap of the access.


The swatches


The Salted Caramel palette
Delicious - matte off white beige - great for browbone highlight
Tempt - matte black
Heavenly - matte light pink
Drizzle - matte medium brown
Enjoy - matte brown

***

Choc - satin mmedium brown
Cake - pink iridescent with golden reflection
Perfect - matte light to medium brown
Crunch - satin light blue - great for the lower lashline, for the pop of color
Sweet - matte warm caramel brown
Fudge - satin medium brown

***

Salted - medium to dark satin brown
Candy - light neutral matte brown
Caramel - satin gold
Spoon - light rosegold
Yum - light champagne shimmer - great for the inner corner


Salted Caramel swatched


The look


First I applied Delicious all over my lids and used Sweet as my transition shade into my crease. I placed the Caramel shade on the outer half of my lids, and Spoon on the inner half. I used a tiny bit of Choc in my outer V of my crease to define it and placed Cake in my inner corners of my eyes. Last but not least I defined my waterline by applying Crunch and a little bit of Spoon.


Follow me on Instagram as well @radioactive_heart